![Kite Paper & Translucent Silk Tissue Paper Folded Flowers, Waldorf Star and Butterfly Window Decor by Oskar's Wooden Ark in Australia](https://cdn.shopify.com/s/files/1/2659/1590/files/10-Simple-Kite-Paper-Window-Art-Designs-Copyright-Oskar_s-Wooden-Ark-Australia-2.png?v=1715674171)
Step by Step Guide to 10 Simple Silk and Kite Folding Paper Designs for Your Windows
May 24, 2024, by Erin Kemppainen
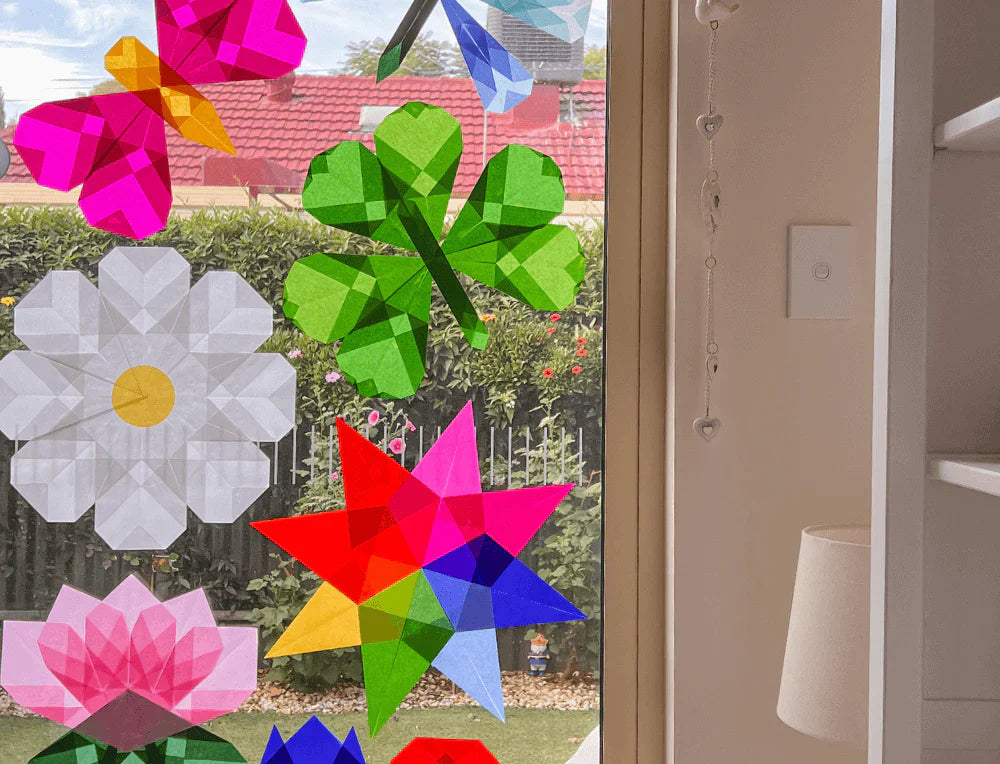
Welcome to the world of paper folding for your windows!
In this guide, we'll explore 10 simple kite and silk folded paper designs to add a splash of colour to your windows. For seasoned crafters, newcomers to the joys of creative expression, and anyone seeking a fun activity to do with your little ones, our step by step guide takes you through each step in an easy to follow format.
In no time, you will have a delightful collection of window stars, flowers, butterflys, dragonflys, hearts and even a three leaf clover to brighten up your space!
We have used the Mercurius Window Star Folding Kite Paper (16x 16 cm) in the following guide. However, there are many paper options you can use, and at Oskar's Wooden Ark we have a large selection of Origami, Folding and Craft Paper to choose from. In addition to your chosen paper, you will also need a glue stick, ruler, pencil and scissors on hand.
Wanting to share your creations? Please share with us on Instagram and Facebook using the hashtag #OskarsWoodenArk.
1. Step by Step Guide to create a Heart Window Star
The simplest designs often start with a folded paper heart for your window!
Mastering this folding method will serve as the foundation for many of the designs in this blog post. Once you've mastered it, the techniques you have learnt will make the other designs much easier.
For this design, you will need two sheets of paper in the same colour.
![Kite Paper & Translucent Silk Tissue Paper Folded Pink Heart Window Decor by Oskar's Wooden Ark in Australia Pink Folding Paper Valentine Heart Art for Window by Oskar's Wooden Ark in Australia](https://cdn.shopify.com/s/files/1/2659/1590/files/Kite-Paper-Heart-Copyright-Oskar_s-Wooden-Ark-Australia.jpg?v=1715672306)
Step 1
![Step 1 of 9: Kite Paper Heart Tutorial Step 1 of 9 of Origami Heart Window Sun Catcher Design by Oskar's Wooden Ark in Australia](https://cdn.shopify.com/s/files/1/2659/1590/files/Kite-Paper-Heart-Tutorial-Step-1.jpg?v=1715834786)
Begin with a square piece of paper.
Step 2
![Step 2 of 9: Kite Paper Heart Tutorial Step 2 of 9 of Silk Tissue Paper Folding Heart Window Sticker by Oskar's Wooden Ark in Australia](https://cdn.shopify.com/s/files/1/2659/1590/files/Kite-Paper-Heart-Tutorial-Step-2.jpg?v=1715834806)
Fold the paper in half diagonally to form a triangle.
Step 3
![Step 3 of 9: Kite Paper Heart Tutorial Step 3 of 9 of Beginner's Kite Paper Folding Heart for Window Decor by Oskar's Wooden Ark in Australia](https://cdn.shopify.com/s/files/1/2659/1590/files/Kite-Paper-Heart-Tutorial-Step-3.jpg?v=1715834829)
Unfold the paper to reveal a crease.
Step 4
![Step 4 of 9: Kite Paper Heart Tutorial Step 4 of 9 of Basic Paper Folding Heart for Kids by Oskar’s Wooden Ark in Australia](https://cdn.shopify.com/s/files/1/2659/1590/files/Kite-Paper-Heart-Tutorial-Step-4.jpg?v=1715834851)
Fold the paper in half diagonally in the opposite direction to form another triangle.
Step 5
![Step 5 of 9: Kite Paper Heart Tutorial Step 5 of 9 of Easy Paper Folding Heart Step by Step Tutorial by Oskar’s Wooden Ark in Australia](https://cdn.shopify.com/s/files/1/2659/1590/files/Kite-Paper-Heart-Tutorial-Step-5.jpg?v=1715834871)
Unfold the paper again to reveal an X-shaped crease.
Step 6
![Step 6 of 9: Kite Paper Heart Tutorial Step 6 of 9 of Japanese Paper Folding Heart for Window Decoration by Oskar’s Wooden Ark in Australia](https://cdn.shopify.com/s/files/1/2659/1590/files/Kite-Paper-Heart-Tutorial-Step-6.jpg?v=1715834891)
Fold two adjacent corners to meet the centre line.
Step 7
![Step 7 of 9: Kite Paper Heart Tutorial Step 7 of 9 of Easy Origami Translucent Heart Window Glass Decor by Oskar’s Wooden Ark in Australia](https://cdn.shopify.com/s/files/1/2659/1590/files/Kite-Paper-Heart-Tutorial-Step-7.jpg?v=1715834915)
Fold the bottom edges inward so they align with the centre fold, creating a point at the bottom.
Step 8
![Step 8 of 9: Kite Paper Heart Tutorial Step 8 of 9 of Origami Paper Heart Activity for Kids by Oskar’s Wooden Ark in Australia](https://cdn.shopify.com/s/files/1/2659/1590/files/Kite-Paper-Heart-Tutorial-Step-8.jpg?v=1715834937)
Fold the upper left corner down to meet the center fold.
Step 9
![Step 9 of 9: Kite Paper Heart Tutorial Step 9 of 9 of Origami for Kids Heart Design for Window Sun Catcher by Oskar’s Wooden Ark in Australia](https://cdn.shopify.com/s/files/1/2659/1590/files/Kite-Paper-Heart-Tutorial-Step-9.jpg?v=1715834959)
Repeat steps 1-8 with a second square piece of paper. Tape the two pieces together at the edges to form a heart shape.
![Kite Paper & Translucent Silk Tissue Paper Folded Pink & Yellow Butterfly Window Decor by Oskar's Wooden Ark in Australia Pink and Yellow Origami Butterfly Easy Step by Step Window Art Tutorial for Kids by Oskar’s Wooden Ark in Australia](https://cdn.shopify.com/s/files/1/2659/1590/files/Kite-Paper-Butterfly-Copyright-Oskar_s-Wooden-Ark-Australia.jpg?v=1715672327)
2. Folded Paper Butterfly for your Windows
To make your Folded Butterfly, you will need four sheets of paper in the same colour for the wings, and one sheet of paper in a contrasting colour for the body.
Build on the heart folding techniques you learnt in the previous guide, and simply add in the body!
Step 1
![Step 1 of 4: Kite Paper Butterfly Tutorial Step 1 of 4 of Silk Paper Folding Butterfly Activity for Children by Oskar’s Wooden Ark in Australia](https://cdn.shopify.com/s/files/1/2659/1590/files/Kite-Paper-Butterfly-Tutorial-Step-1_d423caf6-52d7-47ec-9db9-25b863acce0c.jpg?v=1715907272)
Follow steps 1-9 in the Heart tutorial to create two separate heart designs. These will be the butterfly's wings.
Step 2
![Step 2 of 4: Kite Paper Butterfly Tutorial Step 2 of 4 of Kite Paper Butterfly Window Design Art Tutorial by Oskar’s Wooden Ark in Australia](https://cdn.shopify.com/s/files/1/2659/1590/files/Kite-Paper-Butterfly-Tutorial-Step-2_88edb76b-1731-40cd-8f11-b2a1ec5e024e.jpg?v=1715907289)
Using the single sheet of paper in a contrasting colour, follow steps 1-8 in the Heart tutorial to create the butterfly's body.
Step 3
![Step 3 of 4: Kite Paper Butterfly Tutorial Step 3 of 4 of Tissue Paper Folding Butterfly Sun Catcher Activity by Oskar’s Wooden Ark in Australia](https://cdn.shopify.com/s/files/1/2659/1590/files/Kite-Paper-Butterfly-Tutorial-Step-4_ae067a30-6675-4edd-af7e-25acde2a3fb3.jpg?v=1715907328)
Fold the opposing sides to meet the centre line to form the butterfly's body.
Step 4
![Step 4 of 4: Kite Paper Butterfly Tutorial Step 4 of 4 of Easy to Follow Paper Folding Origami Butterfly Tutorial for Kids by Oskar’s Wooden Ark in Australia](https://cdn.shopify.com/s/files/1/2659/1590/files/Kite-Paper-Butterfly-Tutorial-Step-5_8a880c60-15aa-4d7d-bc11-9521540102a1.jpg?v=1715907346)
Attach the wings to the back of the body (we have used tape) ensuring they are symmetrical.
3. Shamrock or Three-Leaf Clover Folded Window Design
To make your Three-Leaf Clover folded window design, you will need seven pieces of green paper.
You can use any Folding Paper for your designs - we find Kite Paper is a little more durable and has a slight sheen, while Silk Tissue Paper produces a more delicate design. While both have a good level of transparency.
![Kite Paper & Translucent Silk Tissue Paper Folded Green Lucky Clover/Shamrock Window Decor by Oskar's Wooden Ark in Australia Green Clover Shamrock Folding Kite Paper Translucent Window Art Design by Oskar’s Wooden Ark in Australia](https://cdn.shopify.com/s/files/1/2659/1590/files/Kite-Paper-Shamrock-Clover-Copyright-Oskar_s-Wooden-Ark-Australia.jpg?v=1715672347)
Step 1
![Step 1 of 7: Kite Paper Shamrock/Clover Tutorial Step 1 of 7 of St. Patrick’s Day Decor for Window Easy Activity for Kids by Oskar’s Wooden Ark in Australia](https://cdn.shopify.com/s/files/1/2659/1590/files/Kite-Paper-Shamrock-Clover-Tutorial-Step-1.jpg?v=1715910227)
Follow steps 1-8 in the Heart tutorial.
Step 2
![Step 2 of 7: Kite Paper Shamrock/Clover Tutorial Step 2 of 7 of Lucky Clover Window Decoration for Children with Kite Paper by Oskar’s Wooden Ark in Australia](https://cdn.shopify.com/s/files/1/2659/1590/files/Kite-Paper-Shamrock-Clover-Tutorial-Step-2.jpg?v=1715910248)
Make two small folds on either side of the upper left point you folded down in step 8 of the Heart tutorial.
Step 3
![Step 3 of 7: Kite Paper Shamrock/Clover Tutorial Step 3 of 7 of Shamrock Window Sun Catcher with Translucent Folding Paper by Oskar’s Wooden Ark in Australia](https://cdn.shopify.com/s/files/1/2659/1590/files/Kite-Paper-Shamrock-Clover-Tutorial-Step-3.jpg?v=1715910268)
Repeat steps 1 & 2 until you have three hearts.
Step 4
![Step 4 of 7: Kite Paper Shamrock/Clover Tutorial Step 4 of 7 of Simple Origami Activity for Kids Green Clover Design by Oskar’s Wooden Ark in Australia](https://cdn.shopify.com/s/files/1/2659/1590/files/Kite-Paper-Shamrock-Clover-Tutorial-Step-4.jpg?v=1715910289)
Follow steps 1-7 in the Heart tutorial to begin forming the stem.
Step 5
![Step 5 of 7: Kite Paper Shamrock/Clover Tutorial Step 5 of 7 of Satin Folding Paper Clover for Children’s Window by Oskar’s Wooden Ark in Australia](https://cdn.shopify.com/s/files/1/2659/1590/files/Kite-Paper-Shamrock-Clover-Tutorial-Step-5.jpg?v=1715910311)
Fold the opposing sides of the stem piece to meet the centre line.
Step 6
![Step 6 of 7: Kite Paper Shamrock/Clover Tutorial Step 6 of 7 of Irish Window Decor Green Shamrock Clover Origami Activity by Oskar’s Wooden Ark in Australia](https://cdn.shopify.com/s/files/1/2659/1590/files/Kite-Paper-Shamrock-Clover-Tutorial-Step-7.jpg?v=1715910357)
Repeat step 5 to create a thinner piece for the stem.
Step 7
![Step 7 of 7: Kite Paper Shamrock/Clover Tutorial Step 7 of 7 of Easy Paper Folding Tutorial for Window Art Clover by Oskar’s Wooden Ark in Australia](https://cdn.shopify.com/s/files/1/2659/1590/files/Kite-Paper-Shamrock-Clover-Tutorial-Step-8.jpg?v=1715910379)
Attach the three hearts to the stem, positioning them so the points just touch, leaving a small space between each heart.
![Kite Paper & Translucent Silk Tissue Paper Folded White & Yellow Daisy Flower Window Decor by Oskar's Wooden Ark in Australia White and Yellow Daisy Tissue Paper Flower Basic Origami Folding Tutorial by Oskar’s Wooden Ark in Australia](https://cdn.shopify.com/s/files/1/2659/1590/files/Kite-Paper-Daisy-Copyright-Oskar_s-Wooden-Ark-Australia.jpg?v=1715672365)
4. Step by Step Guide to your Folded Paper Daisy
Your Folded Paper Daisy will use eight sheets of paper for the petals, and one sheet of a different colour for the centre.
Have fun exploring different colour combinations to create an entire paper garden!
Step 1
![Step 1 of 3: Kite Paper Daisy Tutorial Step 1 of 3 of Easy Origami Flower Activity for Kids by Oskar’s Wooden Ark in Australia](https://cdn.shopify.com/s/files/1/2659/1590/files/Kite-Paper-Daisy-Tutorial-Step-1.jpg?v=1715912532)
Follow steps 1-9 of the Heart tutorial. Repeat four times so you have four hearts.
Step 2
![Step 2 of 3: Kite Paper Daisy Tutorial Step 2 of 3 of Japanese Silk Tissue Paper Daisy Flower Window Art by Oskar’s Wooden Ark in Australia](https://cdn.shopify.com/s/files/1/2659/1590/files/Kite-Paper-Daisy-Tutorial-Step-2.jpg?v=1715912550)
Cut out a circle in the different colour paper for the centre.
Step 3
![Step 3 of 3: Kite Paper Daisy Tutorial Step 3 of 3 Easy Paper Folding Flower Step by Step Tutorial for Kids by Oskar’s Wooden Ark in Australia](https://cdn.shopify.com/s/files/1/2659/1590/files/Kite-Paper-Daisy-Tutorial-Step-3.jpg?v=1715912570)
Arrange the four hearts so that their edges are just touching, then secure them with tape. Glue the circle to the centre.
5. Guide to Create a Folded Paper Window Lotus
To make your Paper Lotus, you will need five sheets of pink for the petals, and three sheets of green for the leaves.
This would make a beautiful water scene, paired with our Kitpas Window Crayons!
![Kite Paper & Translucent Silk Tissue Paper Folded Pink & Green Lotus Flower Lily Pad Window Decor by Oskar's Wooden Ark in Australia Pink and Green Lotus Paper Folding Step by Step Easy Activity for Kids by Oskar’s Wooden Ark in Australia](https://cdn.shopify.com/s/files/1/2659/1590/files/Kite-Paper-Lotus-Copyright-Oskar_s-Wooden-Ark-Australia.jpg?v=1715672383)
Step 1
![Step 1 of 4: Kite Paper Lotus Tutorial Step 1 of 4 of Basic Origami Flower Lotus Design for Window Decor Art by Oskar’s Wooden Ark in Australia](https://cdn.shopify.com/s/files/1/2659/1590/files/Kite-Paper-Lotus-Tutorial-Step-1.jpg?v=1715914075)
Follow steps 1-7 of the Heart tutorial. Repeat for all the pink and green pieces.
Step 2
![Step 2 of 4: Kite Paper Lotus Tutorial Step 2 of 4 of Translucent Kite Paper Flower Folding Sun Catcher Activity by Oskar’s Wooden Ark in Australia](https://cdn.shopify.com/s/files/1/2659/1590/files/Kite-Paper-Lotus-Tutorial-Step-2.jpg?v=1715914095)
Glue the five pink pieces together at their centre folds, aligning the points.
Step 3
![Step 3 of 4: Kite Paper Lotus Tutorial Step 3 of 4 of Basic Paper Folding Step by Step Activity for Kids by Oskar’s Wooden Ark in Australia](https://cdn.shopify.com/s/files/1/2659/1590/files/Kite-Paper-Lotus-Tutorial-Step-3.jpg?v=1715914116)
Glue the three green pieces together, ensuring the points align as well. Spread them out to match the width of the pink pieces.
Step 4
![Step 4 of 4: Kite Paper Lotus Tutorial Step 4 of 4 of Waldorf Kite Paper Lotus Flower Activity Tutorial for Children by Oskar’s Wooden Ark in Australia](https://cdn.shopify.com/s/files/1/2659/1590/files/Kite-Paper-Lotus-Tutorial-Step-4.jpg?v=1715914138)
Attach both pieces together, with the green pieces positioned behind the pink ones.
![Kite Paper & Translucent Silk Tissue Paper Folded Rainbow Waldorf Star Window Decor by Oskar's Wooden Ark in Australia Rainbow Waldorf Star Window Sun Catcher Activity for Kids by Oskar’s Wooden Ark in Australia](https://cdn.shopify.com/s/files/1/2659/1590/files/Kite-Paper-Waldorf-Star-Copyright-Oskar_s-Wooden-Ark-Australia.jpg?v=1715672417)
6. Traditional Waldorf Window Star - Step by Step Guide
This design is a favourite and the simplest of the Waldorf Window Stars.
Have fun with different colour combinations. For each Window Star, you will need eight sheets of paper.
Step 1
![Step 1 of 8: Kite Paper Waldorf Star Tutorial Step 1 of 8 of Waldorf Window Star Step by Step Tutorial for Kids by Oskar’s Wooden Ark in Australia](https://cdn.shopify.com/s/files/1/2659/1590/files/Kite-Paper-Waldorf-Star-Tutorial-Step-1.jpg?v=1715917887)
Begin with a square piece of paper.
Step 2
![Step 2 of 8: Kite Paper Waldorf Star Tutorial Step 2 of 8 of Waldorf Kite Paper Star Easy Paper Folding Activity by Oskar’s Wooden Ark in Australia](https://cdn.shopify.com/s/files/1/2659/1590/files/Kite-Paper-Waldorf-Star-Tutorial-Step-2.jpg?v=1715917908)
Fold the paper in half diagonally to form a triangle.
Step 3
![Step 3 of 8: Kite Paper Waldorf Star Tutorial Step 3 of 8 of Lucky Star Origami Paper Folding Tutorial for Children by Oskar’s Wooden Ark in Australia](https://cdn.shopify.com/s/files/1/2659/1590/files/Kite-Paper-Waldorf-Star-Tutorial-Step-3.jpg?v=1715917928)
Unfold the paper to reveal the crease.
Step 4
![Step 4 of 8: Kite Paper Waldorf Star Tutorial Step 4 of 8 of Translucent Waldorf Window Star Sun Catcher for Window by Oskar’s Wooden Ark in Australia](https://cdn.shopify.com/s/files/1/2659/1590/files/Kite-Paper-Waldorf-Star-Tutorial-Step-4.jpg?v=1715917950)
Fold the paper in half diagonally in the opposite direction to form another triangle, then unfold it.
Step 5
![Step 5 of 8: Kite Paper Waldorf Star Tutorial Step 5 of 8 of Simple Window Star Decoration using Silk Tissue Paper by Oskar’s Wooden Ark in Australia](https://cdn.shopify.com/s/files/1/2659/1590/files/Kite-Paper-Waldorf-Star-Tutorial-Step-5.jpg?v=1715917975)
Fold the bottom left corner up to meet the centre fold.
Step 6
![Step 6 of 8: Kite Paper Waldorf Star Tutorial Step 6 of 8 of Easy Step by Step Waldorf Window Star Kite Paper Activity by Oskar’s Wooden Ark in Australia](https://cdn.shopify.com/s/files/1/2659/1590/files/Kite-Paper-Waldorf-Star-Tutorial-Step-6.jpg?v=1715918003)
Repeat the previous step on the other side to complete the first point of your star. Repeat steps 1-6 for all eight sheets.
Step 7
![Step 7 of 8: Kite Paper Waldorf Star Tutorial Step 7 of 8 of Step by Step Rainbow Window Star Tissue Paper Folding Tutorial by Oskar’s Wooden Ark in Australia](https://cdn.shopify.com/s/files/1/2659/1590/files/Kite-Paper-Waldorf-Star-Tutorial-Step-7.jpg?v=1715918024)
Use glue to attach each piece to the previous one, ensuring their points meet at the centre.
Step 8
![Step 8 of 8: Kite Paper Waldorf Star Tutorial Step 8 of 8 of Waldorf Window Star Decoration Origami Kite Paper by Oskar’s Wooden Ark in Australia](https://cdn.shopify.com/s/files/1/2659/1590/files/Kite-Paper-Waldorf-Star-Tutorial-Step-8.jpg?v=1715918051)
Repeat step 7 for all pieces to form your Window Star.
7. Guide to Make your Paper Dragonfly
To make your Paper Dragonfly Window Decoration, you will need four sheets of paper for the wings, and one contrasting colour for the body.
We have used two different colours for the wings to create more of a contrast.
![Kite Paper & Translucent Silk Tissue Paper Folded Blue & Green Dragonfly Window Decor by Oskar's Wooden Ark in Australia Blue and Green Kite Paper Folding Dragonfly Window Decor by Oskar’s Wooden Ark in Australia](https://cdn.shopify.com/s/files/1/2659/1590/files/Kite-Paper-Dragonfly-Copyright-Oskar_s-Wooden-Ark-Australia.jpg?v=1715672437)
Step 1
![Step 1 of 7: Kite Paper Dragonfly Tutorial Step 1 of 7 of Easy Origami Dragonfly Window Art by Oskar’s Wooden Ark in Australia](https://cdn.shopify.com/s/files/1/2659/1590/files/Kite-Paper-Dragonfly-Tutorial-Step-1.jpg?v=1715920005)
Follow steps 1-8 of the Heart tutorial.
Step 2
![Step 2 of 7: Kite Paper Dragonfly Tutorial Step 2 of 7 of Simple Origami Step by Step Dragonfly by Oskar’s Wooden Ark in Australia](https://cdn.shopify.com/s/files/1/2659/1590/files/Kite-Paper-Dragonfly-Tutorial-Step-2.jpg?v=1715920025)
Fold the left side into the centre fold to form a point.
Step 3
![Step 3 of 7: Kite Paper Dragonfly Tutorial Step 3 of 7 of Easy Kite Paper Folding Dragonfly Tutorial for Kids by Oskar’s Wooden Ark in Australia](https://cdn.shopify.com/s/files/1/2659/1590/files/Kite-Paper-Dragonfly-Tutorial-Step-3.jpg?v=1715920048)
Repeat the previous step on the other side.
Repeat steps 1-3 three more times to form the wings.
Step 4
![Step 4 of 7: Kite Paper Dragonfly Tutorial Step 4 of 7 of Basic Origami Dragonfly Translucent Window Art by Oskar’s Wooden Ark in Australia](https://cdn.shopify.com/s/files/1/2659/1590/files/Kite-Paper-Dragonfly-Tutorial-Step-4.jpg?v=1715920078)
Follow steps 1-8 of the Heart tutorial on the remaining piece of paper to begin the dragonfly's body.
Step 5
![Step 5 of 7: Kite Paper Dragonfly Tutorial Step 5 of 7 of Japanese Silk Tissue Paper Folding Dragonfly Activity by Oskar’s Wooden Ark in Australia](https://cdn.shopify.com/s/files/1/2659/1590/files/Kite-Paper-Dragonfly-Tutorial-Step-6.jpg?v=1715920146)
Fold the opposing sides to meet the centre line.
Step 6
![Step 6 of 7: Kite Paper Dragonfly Tutorial Step 6 of 7 of Waldorf Kite Paper Dragonfly Activity Window Decor by Oskar’s Wooden Ark in Australia](https://cdn.shopify.com/s/files/1/2659/1590/files/Kite-Paper-Dragonfly-Tutorial-Step-8.jpg?v=1715920211)
Repeat step 5 to create a thinner body.
Step 7
![Step 7 of 7: Kite Paper Dragonfly Tutorial Step 7 of 7 of Easy Step by Step Origami Dragonfly Window Decor for Kids by Oskar’s Wooden Ark in Australia](https://cdn.shopify.com/s/files/1/2659/1590/files/Kite-Paper-Dragonfly-Tutorial-Step-9.jpg?v=1715920240)
Attach the wings to the back of the body (we have used tape) ensuring they are symmetrical.
![Kite Paper & Translucent Silk Tissue Paper Folded Red & White Mushroom Toadstool Window Decor by Oskar's Wooden Ark in Australia Red and White Kite Paper Folding Toadstool Mushroom Window Art by Oskar’s Wooden Ark in Australia](https://cdn.shopify.com/s/files/1/2659/1590/files/Kite-Paper-Mushroom-Copyright-Oskar_s-Wooden-Ark-Australia.jpg?v=1715672522)
8. Guide to Make your Folded Paper Mushroom
To make your Folded Paper Mushroom Window Decoration, you will need one sheet of red and one sheet of white.
Team up with Flowers, Butterfly and Dragonfly from our guide, for a truly magical and imaginative window display.
Step 1
![Step 1 of 9: Kite Paper Mushroom Tutorial Step 1 of 9 of Easy Origami Mushroom Design for Kids by Oskar’s Wooden Ark in Australia](https://cdn.shopify.com/s/files/1/2659/1590/files/Kite-Paper-Mushroom-Tutorial-Step-1.jpg?v=1715921206)
Follow steps 1-5 of the Heart tutorial.
Step 2
![Step 2 of 9: Kite Paper Mushroom Tutorial Step 2 of 9 of Origami for Beginners Folding Mushroom Toadstool for Window by Oskar’s Wooden Ark in Australia](https://cdn.shopify.com/s/files/1/2659/1590/files/Kite-Paper-Mushroom-Tutorial-Step-2.jpg?v=1715921223)
Fold the lower right corner into the centre point.
Step 3
![Step 3 of 9: Kite Paper Mushroom Tutorial Step 3 of 9 of Silk Tissue Paper Toadstool Window Art Sun Catcher and Decor by Oskar’s Wooden Ark in Australia](https://cdn.shopify.com/s/files/1/2659/1590/files/Kite-Paper-Mushroom-Tutorial-Step-3.jpg?v=1715921243)
Unfold it to reveal the crease you just made.
Step 4
![Step 4 of 9: Kite Paper Mushroom Tutorial Step 4 of 9 of Simple Step by Step Paper Folding Guide for Mushroom Autumn Decor by Oskar’s Wooden Ark in Australia](https://cdn.shopify.com/s/files/1/2659/1590/files/Kite-Paper-Mushroom-Tutorial-Step-4.jpg?v=1715921264)
Fold the upper left corner to meet the newly formed crease.
Step 5
![Step 5 of 9: Kite Paper Mushroom Tutorial Step 5 of 9 of Beginners Origami Guide for Creating Window Art by Oskar’s Wooden Ark in Australia](https://cdn.shopify.com/s/files/1/2659/1590/files/Kite-Paper-Mushroom-Tutorial-Step-5.jpg?v=1715921285)
Fold the lower right corner upward, overlapping the upper left corner slightly.
Step 6
![Step 6 of 9: Kite Paper Mushroom Tutorial Step 6 of 9 of Easy Mushroom Paper Folding Design for Children by Oskar’s Wooden Ark in Australia](https://cdn.shopify.com/s/files/1/2659/1590/files/Kite-Paper-Mushroom-Tutorial-Step-6.jpg?v=1715921307)
Fold the upper right corner inward to align with the upper left corner.
Step 7
![Step 7 of 9: Kite Paper Mushroom Tutorial Step 7 of 9 of Basic Paper Folding Mushroom Tutorial for Kids by Oskar’s Wooden Ark in Australia](https://cdn.shopify.com/s/files/1/2659/1590/files/Kite-Paper-Mushroom-Tutorial-Step-7.jpg?v=1715921329)
Repeat the previous step with the lower left corner to complete the top of the mushroom.
Step 8
![Step 8 of 9: Kite Paper Mushroom Tutorial Step 8 of 9 of Easy Paper Folding Step by Step Activity for Kids by Oskar’s Wooden Ark in Australia](https://cdn.shopify.com/s/files/1/2659/1590/files/Kite-Paper-Mushroom-Tutorial-Step-8.jpg?v=1715921351)
Follow steps 1-8 in the Heart tutorial to create the base of the mushroom.
Step 9
![Step 9 of 9: Kite Paper Mushroom Tutorial Step 9 of 9 of Japanese Paper Folding Mushroom Decor for Window by Oskar’s Wooden Ark in Australia](https://cdn.shopify.com/s/files/1/2659/1590/files/Kite-Paper-Mushroom-Tutorial-Step-9.jpg?v=1715921374)
Attach the base to the back of the mushroom top.
9. Step by Step Guide to make your Paper Tulip
To make your folded paper tulip, first select your colour for the bud (one sheet), and pair with a green sheet for the stem.
Make a selection of different colour Tulips and create your own Tulip Paddock!
![Kite Paper & Translucent Silk Tissue Paper Folded Tulip Flower Window Decor by Oskar's Wooden Ark in Australia Blue Tulip Paper Folding Flower Tutorial for Beginners of Origami by Oskar’s Wooden Ark in Australia](https://cdn.shopify.com/s/files/1/2659/1590/files/Kite-Paper-Tulip-Copyright-Oskar_s-Wooden-Ark-Australia.jpg?v=1715672558)
Step 1
![Step 1 of 14: Kite Paper Tulip Tutorial Step 1 of 14 of Simple Paper Folding Flower Window Art Decor by Oskar’s Wooden Ark in Australia](https://cdn.shopify.com/s/files/1/2659/1590/files/Kite-Paper-Tulip-Tutorial-Step-1.jpg?v=1715923087)
Begin with a square piece of paper for the bud of the tulip, orientated so it looks like a diamond.
Step 2
![Step 2 of 14: Kite Paper Tulip Tutorial Step 2 of 14 of Silk Tissue Paper Flower Design for Kids by Oskar’s Wooden Ark in Australia](https://cdn.shopify.com/s/files/1/2659/1590/files/Kite-Paper-Tulip-Tutorial-Step-2.jpg?v=1715923109)
Fold the paper in half to form a triangle.
Step 3
![Step 3 of 14: Kite Paper Tulip Tutorial Step 3 of 14 of Step by Step Paper Folding Tulip Flower Activity for Kids by Oskar’s Wooden Ark in Australia](https://cdn.shopify.com/s/files/1/2659/1590/files/Kite-Paper-Tulip-Tutorial-Step-3.jpg?v=1715923135)
Fold one side of the triangle inward, creating a crease at the centre.
Step 4
![Step 4 of 14: Kite Paper Tulip Tutorial Step 4 of 14 of Easy Origami Flowers for Beginners of Paper Folding by Oskar’s Wooden Ark in Australia](https://cdn.shopify.com/s/files/1/2659/1590/files/Kite-Paper-Tulip-Tutorial-Step-4.jpg?v=1715923156)
Repeat the previous step on the other side, then flip the piece over.
Step 5
![Step 5 of 14: Kite Paper Tulip Tutorial Step 5 of 14 of Japanese Tissue Paper Flowers for Window Decor by Oskar’s Wooden Ark in Australia](https://cdn.shopify.com/s/files/1/2659/1590/files/Kite-Paper-Tulip-Tutorial-Step-5.jpg?v=1715923188)
Fold one of the new points inward.
Step 6
![Step 6 of 14: Kite Paper Tulip Tutorial Step 6 of 14 of Kite Paper Folding Flowers for Spring by Oskar’s Wooden Ark in Australia](https://cdn.shopify.com/s/files/1/2659/1590/files/Kite-Paper-Tulip-Tutorial-Step-6.jpg?v=1715923207)
Repeat the previous step on the other side to complete the tulip bud.
Step 7
![Step 7 of 14: Kite Paper Tulip Tutorial Step 7 of 14 of Kite Paper Seasonal Spring Decor Flower Art by Oskar’s Wooden Ark in Australia](https://cdn.shopify.com/s/files/1/2659/1590/files/Kite-Paper-Tulip-Tutorial-Step-7_0facc32e-8c0d-4ad3-bce4-0af290042622.jpg?v=1716520565)
For the stem, follow steps 1-2 before folding the right corner to meet the centre fold.
Step 8
![Step 8 of 14: Kite Paper Tulip Tutorial Step 8 of 14 of Waldorf Kite Paper Folding Flowers Window Sun Catcher Tutorial by Oskar’s Wooden Ark in Australia](https://cdn.shopify.com/s/files/1/2659/1590/files/Kite-Paper-Tulip-Tutorial-Step-8_867883fa-98a9-47ad-b3d8-380eca872766.jpg?v=1716520651)
Repeat the previous step on the other side.
Step 9
![Step 9 of 14: Kite Paper Tulip Tutorial Step 9 of 14 of Simple Paper Flowers for Window Art by Oskar’s Wooden Ark in Australia](https://cdn.shopify.com/s/files/1/2659/1590/files/Kite-Paper-Tulip-Tutorial-Step-9_5743216b-978e-463e-8279-2ffd0d09a83b.jpg?v=1716520695)
Fold the bottom edge up to meet the centre fold.
Step 10
![Step 10 of 14: Kite Paper Tulip Tutorial Step 10 of 14 of Origami for Kids Paper Folding Flower Step by Step Guide by Oskar’s Wooden Ark in Australia](https://cdn.shopify.com/s/files/1/2659/1590/files/Kite-Paper-Tulip-Tutorial-Step-10_69b7663e-54be-46c1-85ab-fd59149e8bee.jpg?v=1716520749)
Repeat the previous step on the other side.
Step 11
![Step 11 of 14: Kite Paper Tulip Tutorial Step 11 of 14 of Silk Tissue Paper Flower Window Display by Oskar’s Wooden Ark in Australia](https://cdn.shopify.com/s/files/1/2659/1590/files/Kite-Paper-Tulip-Tutorial-Step-11_60d1b9ef-ab6c-44bd-9b10-837f550a21d1.jpg?v=1716520789)
Fold the upper right edge inward to align with the centre fold.
Step 12
![Step 12 of 14: Kite Paper Tulip Tutorial Step 12 of 14 of Easy Origami Flower Design for Children by Oskar’s Wooden Ark in Australia](https://cdn.shopify.com/s/files/1/2659/1590/files/Kite-Paper-Tulip-Tutorial-Step-12_d49518d6-be81-4a28-a033-e7fffda00fa9.jpg?v=1716520828)
Repeat the previous step on the other side.
Step 13
![Step 13 of 14: Kite Paper Tulip Tutorial Step 13 of 14 of Silk Tissue Paper Flower Art Design Tutorial by Oskar’s Wooden Ark in Australia](https://cdn.shopify.com/s/files/1/2659/1590/files/Kite-Paper-Tulip-Tutorial-Step-13_00f01bd6-2fe6-4866-9e60-bf3a43f559e2.jpg?v=1716520866)
Overlap the bottom point over the top one, positioning it diagonally.
Step 14
![Step 14 of 14: Kite Paper Tulip Tutorial Step 14 of 14 of Translucent Kite Tissue Paper Folding Flower Tulip for Window by Oskar’s Wooden Ark in Australia](https://cdn.shopify.com/s/files/1/2659/1590/files/Kite-Paper-Tulip-Tutorial-Step-14.jpg?v=1715923426)
Attach the stem to the back of the bud to form your tulip.
![Kite Paper Autumn/Maple LeafKite Paper & Translucent Silk Tissue Paper Folded Red Autumn Leaf/Maple Leaf Window Decor by Oskar's Wooden Ark in Australia Red Maple Autumn Leaf Paper Folding Tutorial for Window by Oskar’s Wooden Ark in Australia](https://cdn.shopify.com/s/files/1/2659/1590/files/Kite-Paper-Autumn-Leaf-Copyright-Oskar_s-Wooden-Ark-Australia.jpg?v=1715672581)
10. Creating a Paper Autumn Leaf for Your Window
To make your Autumn Paper Leaf, you will need three sheets in the same colour for the leaves, and one sheet of a contrasting colour for the stem.
If you feel extra creative, play with different colours for the leaves, and be inspired by what you find on a nature walk!
Step 1
![Step 1 of 20: Kite Paper Autumn/Maple Leaf Tutorial Step 1 of 20 of Easy Origami Autumn Leaf Decor by Oskar’s Wooden Ark in Australia](https://cdn.shopify.com/s/files/1/2659/1590/files/Kite-Paper-Leaf-Tutorial-Step-1.jpg?v=1715926878)
Prepare 3 x pieces measuring 13cm (L) & 8cm (W), and 2 x pieces measuring 9cm (L) & 5cm (W).
Step 2
![Step 2 of 20: Kite Paper Autumn/Maple Leaf Tutorial Step 2 of 20 of Silk Tissue Paper Leaf Seasonal Decor Sticker by Oskar’s Wooden in Australia](https://cdn.shopify.com/s/files/1/2659/1590/files/Kite-Paper-Leaf-Tutorial-Step-2.jpg?v=1715926900)
Begin with a 13 x 8 cm piece first.
Step 3
![Step 3 of 20: Kite Paper Autumn/Maple Leaf Tutorial Step 3 of 20 of Japanese Silk Tissue Paper Folding Leaf Tutorial by Oskar’s Wooden Ark in Australia](https://cdn.shopify.com/s/files/1/2659/1590/files/Kite-Paper-Leaf-Tutorial-Step-3.jpg?v=1715926922)
Fold it in half long ways.
Step 4
![Step 4 of 20: Kite Paper Autumn/Maple Leaf Tutorial Step 4 of 20 of Step by Step Paper Folding Tutorial Leaf for Kids by Oskar’s Wooden Ark in Australia](https://cdn.shopify.com/s/files/1/2659/1590/files/Kite-Paper-Leaf-Tutorial-Step-4.jpg?v=1715926948)
Unfold it to reveal the newly made crease.
Step 5
![Step 5 of 20: Kite Paper Autumn/Maple Leaf Tutorial Step 5 of 20 of Simple Kite Paper Autumn Leaf Decor for Window by Oskar’s Wooden Ark in Australia](https://cdn.shopify.com/s/files/1/2659/1590/files/Kite-Paper-Leaf-Tutorial-Step-5.jpg?v=1715926971)
Fold each of the four points inward to align with the centre fold.
Step 6
![Step 6 of 20: Kite Paper Autumn/Maple Leaf Tutorial Step 6 of 20 of Paper Folding Autumn Leaf Guide for Kids by Oskar’s Wooden Ark in Australia](https://cdn.shopify.com/s/files/1/2659/1590/files/Kite-Paper-Leaf-Tutorial-Step-6.jpg?v=1715926992)
Unfold them all to reveal the newly made creases.
Step 7
![Step 7 of 20: Kite Paper Autumn/Maple Leaf Tutorial Step 7 of 20 of Easy Kite Paper Autumn Leaf by Oskar’s Wooden Ark in Australia](https://cdn.shopify.com/s/files/1/2659/1590/files/Kite-Paper-Leaf-Tutorial-Step-7.jpg?v=1715927014)
Fold each of the four points inwards, this time aligning them with the crease made in the previous step.
Step 8
![Step 8 of 20: Kite Paper Autumn/Maple Leaf Tutorial Step 8 of 20 of Translucent Window Art Autumn Leaf by Oskar’s Wooden Ark in Australia](https://cdn.shopify.com/s/files/1/2659/1590/files/Kite-Paper-Leaf-Tutorial-Step-8.jpg?v=1715927036)
For the two bottom corners, fold down the crease made in step 6 to align with the centre fold.
Step 9
![Step 9 of 20: Kite Paper Autumn/Maple Leaf Tutorial Step 9 of 20 of Silk Folding Paper Leaf for Origami Beginners by Oskar’s Wooden Ark in Australia](https://cdn.shopify.com/s/files/1/2659/1590/files/Kite-Paper-Leaf-Tutorial-Step-9.jpg?v=1715927057)
For the two upper corners, fold them along the crease made in step 7.
Step 10
![Step 10 of 20: Kite Paper Autumn/Maple Leaf Tutorial Step 10 of 20 of Simple Paper Autumn Leaf Decoration for Window by Oskar’s Wooden Ark in Australia](https://cdn.shopify.com/s/files/1/2659/1590/files/Kite-Paper-Leaf-Tutorial-Step-10.jpg?v=1715927078)
Fold the two upper corners inwards to the centre fold. Repeat steps 1-10 for the other two 13 x 8 cm pieces.
Step 11
![Step 11 of 20: Kite Paper Autumn/Maple Leaf Tutorial Step 11 of 20 of Paper Folding Autumn Leaf Step by Step by Oskar’s Wooden Ark in Australia](https://cdn.shopify.com/s/files/1/2659/1590/files/Kite-Paper-Leaf-Tutorial-Step-11.jpg?v=1715927101)
With the 9 x 5 cm piece, follow steps 1-5.
Step 12
![Step 12 of 20: Kite Paper Autumn/Maple Leaf Tutorial Step 12 of 20 of Waldorf Kite Paper Leaf Decoration for Window by Oskar’s Wooden Ark in Australia](https://cdn.shopify.com/s/files/1/2659/1590/files/Kite-Paper-Leaf-Tutorial-Step-12.jpg?v=1715927121)
Follow step 7 for the bottom corners only.
Step 13
![Step 13 of 20: Kite Paper Autumn/Maple Leaf Tutorial Step 13 of 20 of Easy Paper Folding Tutorial for Kids by Oskar’s Wooden Ark in Australia](https://cdn.shopify.com/s/files/1/2659/1590/files/Kite-Paper-Leaf-Tutorial-Step-13.jpg?v=1715927144)
Follow step 10 for the bottom corners only. Repeat steps 11-13 for the other 9 x 5 cm piece.
Step 14
![Step 14 of 20: Kite Paper Autumn/Maple Leaf Tutorial Step 14 of 20 of Basic Autumn Leaf Translucent Window Art Decor by Oskar’s Wooden Ark in Australia](https://cdn.shopify.com/s/files/1/2659/1590/files/Kite-Paper-Leaf-Tutorial-Step-14.jpg?v=1715927164)
Attach the three larger pieces together along the first crease made in step 5, with the longer sides pointing outwards.
Step 15
![Step 15 of 20: Kite Paper Autumn/Maple Leaf Tutorial Step 15 of 20 of Window Art Autumn Leaf Tutorial for Children by Oskar’s Wooden Ark in Australia](https://cdn.shopify.com/s/files/1/2659/1590/files/Kite-Paper-Leaf-Tutorial-Step-15.jpg?v=1715927190)
Attach the two smaller pieces to the centre folds of the two outside larger pieces.
Step 16
![Step 16 of 20: Kite Paper Autumn/Maple Leaf Tutorial Step 16 of 20 of Silk Tissue Paper Art for Window Art Seasonal Display by Oskar’s Wooden Ark in Australia](https://cdn.shopify.com/s/files/1/2659/1590/files/Kite-Paper-Leaf-Tutorial-Step-16.jpg?v=1715927216)
Follow steps 1-7 of the Heart tutorial to begin creating the stem.
Step 17
![Step 17 of 20: Kite Paper Autumn/Maple Leaf Tutorial Step 17 of 20 of Origami for Kids Autumn Leaf Paper Folding Activity by Oskar’s Wooden Ark in Australia](https://cdn.shopify.com/s/files/1/2659/1590/files/Kite-Paper-Leaf-Tutorial-Step-17.jpg?v=1715927237)
Fold the opposing sides of the stem piece to meet the centre fold.
Step 18
![Step 18 of 20: Kite Paper Autumn/Maple Leaf Tutorial Step 18 of 20 of Seasonal Window Decor Paper Folding Autumn Leaf by Oskar’s Wooden Ark in Australia](https://cdn.shopify.com/s/files/1/2659/1590/files/Kite-Paper-Leaf-Tutorial-Step-18.jpg?v=1715927258)
Repeat the previous step to create a thinner piece for the stem.
Step 19
![Step 19 of 20: Kite Paper Autumn/Maple Leaf Tutorial Step 19 of 20 of Seasonal Window Art Autumn Leaf Sun Catcher by Oskar’s Wooden Ark in Australia](https://cdn.shopify.com/s/files/1/2659/1590/files/Kite-Paper-Leaf-Tutorial-Step-19.jpg?v=1715927277)
Repeat again.
Step 20
![Step 20 of 20: Kite Paper Autumn/Maple Leaf Tutorial Step 20 of 20 of DIY Window Art for Autumn Simple Paper Folding Activity for Kids by Oskar’s Wooden Ark in Australia](https://cdn.shopify.com/s/files/1/2659/1590/files/Kite-Paper-Leaf-Tutorial-Step-20.jpg?v=1715927296)
Attach the stem to the back of the leaf.
Wanting to make more Waldorf Window Stars?
We hope you're feeling inspired and have discovered how easy it is to make simple paper folding flowers, hearts and window stars. Ready for a new challenge ... check out our blog post on Creating Waldorf Rainbow Window Stars